Rigid body Types: Static, Kinematic, And Dynamic
Rigid bodies are considered one of physics mechanics branches and according to Wikipedia, a rigid body (also known as a rigid object) is a solid body in which deformation is zero or so small it can be neglected. The distance between the individual particles making up the rigid body remains unchanged under the action of external forces. Basically, rigid bodies are things that do not change shape, unlike deformable bodies which are things that do change shape.
The main focus of this article is on the types of rigid bodies, which are static, kinematics, and kinetics (aka dynamics as in most physics books and game engines).
Static
It’s the study of bodies that are in an equilibrium state, an equilibrium state is defined when the net force acting on a certain body equals zero, moreover, the net torque (moment or moment of force) acting on it equals zero. Therefore, we can replace those forces with a single force called the resultant force where Fr = F1 + F2 + Fn, where n any positive number, as well as replace the moments with a single moment representing the resultant moment Mr = M1 + M2 + Mn.
We aren’t going to delve too deep into solving static problems as it’s out of the scope of this article we are just going to see how static bodies behave in game engines such as unity, unreal, etc. So let’s take a look at the rigid body 2D component in Unity.
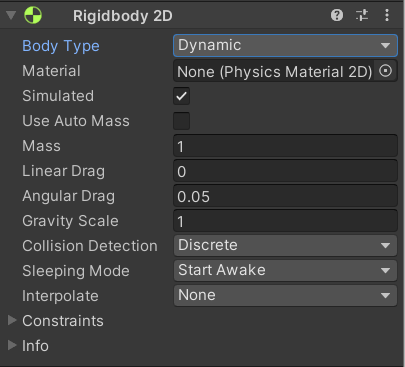
- When you first add a rigid body component to a game object it’s defaulted to dynamic so let’s change its’ body type to static and see what we have.
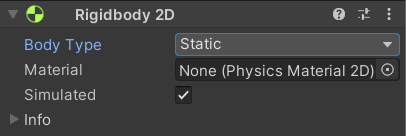
In Unity, a static rigid body 2D doesn’t move under simulation at all, it collides only with dynamic rigid body 2Ds, among the three different body types the static body type is the least resource-intensive one.
Notice how static rigid body 2D only collides with dynamic type as I stated above. It does not collide with a kinematic type, as you can see it just moves through it and continues moving along its’ velocity direction.
In effect, if you want to use a static rigid body 2D on a game object that has collider2D and you know for sure that you aren’t going to move that game object at run-time somewhere down the line, then you shouldn’t add a rigid body to that game object at all, cause unity attach a static rigid body 2D along with each collider by default, however, if you intend to move that game object later, according to unity docs it’s better to add a rigid body and explicitly mark it as a static type for performance reason.
A collision between two static rigid body 2D that intersect isn’t registered. static rigid body 2D can interact with kinematic rigid body 2D if and only if one of these object colliders is marked as a trigger. However, there is a feature that allows the kinematic body to interact with other bodies besides the dynamic one called “Full Kinematic Contacts”, which I will talk about later.
To make your game object move, and rotate in a realistic way you have to use physics (in other words receives forces, torque, influenced by gravity and air resistance, etcetera), to do so in Unity you have to attach a rigid body component to it which will make this game object simulated and controlled by the physics system, and obviously, you need to attach a collider along with it so it can collide with the environment and other game objects.
Kinematic
Kinematic is the branch of mechanics that deals with bodies’ movement and describes their motion without getting into the causes of motion applied to them such as; gravitational force, and torque.
As kinematic only describes motion, it doesn’t include any forces that could affect the rotation of bodies, therefore rotational motion is concerned about the relationship between the angle of rotation, angular acceleration, angular velocity, and time.
If we take a look at the Unity rigid body component with the kinematic body type selected, we can see that neither mass nor gravity properties exist anymore.
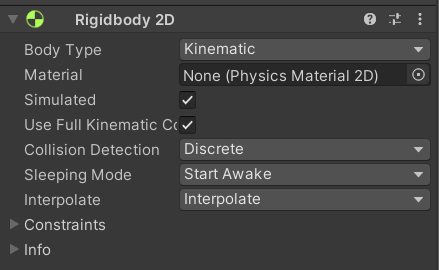
A kinematic rigid body only moves under simulation via its’ velocity, however, its’ velocity isn’t influenced by any forces or gravity as mentioned above. To position or rotate a kinematic body in Unity we can use the Move Position and Move Rotation functions from a script.
Move Position, as the name suggests, moves a rigid body to a certain position, this affects the object by a rapid velocity to move from the current position to the desired one. Move Rotation works the same but it calculates the angular velocity instead of the linear one to rotate the rigid body to a certain angle in degrees.
This is the declaration of the two functions, you can specify a position to move a game object from the current position to the new one, as well as you can rotate a game object by a certain angle.
// in 2D
public void MovePosition(Vector2 position);
public void MoveRotation(float angle);
// in 3D
public void MovePosition(Vector3 position);
public void MoveRotation(Quaternion rot);
In the case of 2D, It’s recommended to use them only for small movement or rotational movement since rigid body 2D components have a fixed limit on how fast they can move or rotate.
Let’s take a look at different examples of how you can use them in both 2D and 3D environments:
// desiredAngle is a float holds the angle in degrees
rigidbody2D.MoveRotation(desiredAngle);
In this case, we simply defined an angle (90 degrees) to rotate this game object around the z-axis, moreover, we can rotate this game object constantly without stopping by simply adding some value (rotation speed) to the original rigid body rotation as follows.
rigidbody2D.MoveRotation(rigidbody2D.rotation + rotationSpeed * Time.fixedDeltaTime);
That possible cause rigidbody2D.rotation is just a float value that holds the rotation of this game object and updates whenever its’ rotation changes around the z-axis (2D objects only rotate around a single axis that either points away from us (into the page) in case of a left-handed coordinate system or toward us (out of the page) in case of a right-handed coordinate system). In Unity, it’s the z-axis that point away from us (into the page).
When it comes to moving a game object each frame we could do the same except this time the rigidbody2D.position is a vector, so we can add a direction vector to it so it moves to the desired location or just keeps moving in that direction infinitely, you can as well multiply the direction vector by some linear speed to control its’ velocity magnitude.
rigidbody2D.MovePosition(rigidbody2D.position + (direction * speed) * Time.fixedDeltaTime);

Moving a game object in 3D works the same as in 2D the only difference is we need to specify the direction using a 3D vector cause we dealing with three-axis x, y, and z. However, rotation in 3D is different, we can specify a rotation around any axis, Move Rotation in 3D takes a Quaternion argument and that is another way to represent 3D rotation, I am not going to talk about quaternions in this article since they are too complex and a topic on their own, but let’s say we want to rotate a game object 30 degrees around the y-axis, in this case, we can apply this rotation using Euler angles but we need to store them as quaternions, In Unity3D we have a method we can use.
public static Quaternion Euler(float x, float y, float z);
If we want to rotate the game object continuously we can specify the number of degrees we want it to rotate each frame then, can multiply this rotation with our rigid body rotation which also stored in quaternions as follows:
rb.MovePosition(rb.position + (Vector3.left * 5.0f * Time.fixedDeltaTime));
rb.MoveRotation(rb.rotation * Quaternion.Euler(1.0f, 1.0f, 1.0f));

Originally a kinematic body doesn’t collide with other body types but with dynamic ones, however, in the above image, if you have noticed that “use full kinematic contacts” was ticked, this is a feature that allows a kinematic rigid body to collide with not only dynamic bodies but with other body types. Hence, collision callbacks in the script will work just as you would expect when dealing with dynamic types, however, triggers happen all the time whether this feature was ticked or not.
Kinematic rigid bodies don’t move unless you explicitly tell them so, in many cases, this is great cause you have full control of them. Keep in mind that because the kinematic rigid body is affected by neither forces nor gravity that makes it fast and has a lower demand on system resources than a Dynamic Rigid body.
As much as it’s important to understand the theory about any topic, I do believe the best way to learn is by doing so let’s see how we can build an enemy AI that can crawl around a platform using only a kinematic rigid body 2D.
Before we start, you can find the source code along with the project files in the resources section at the end of the article.

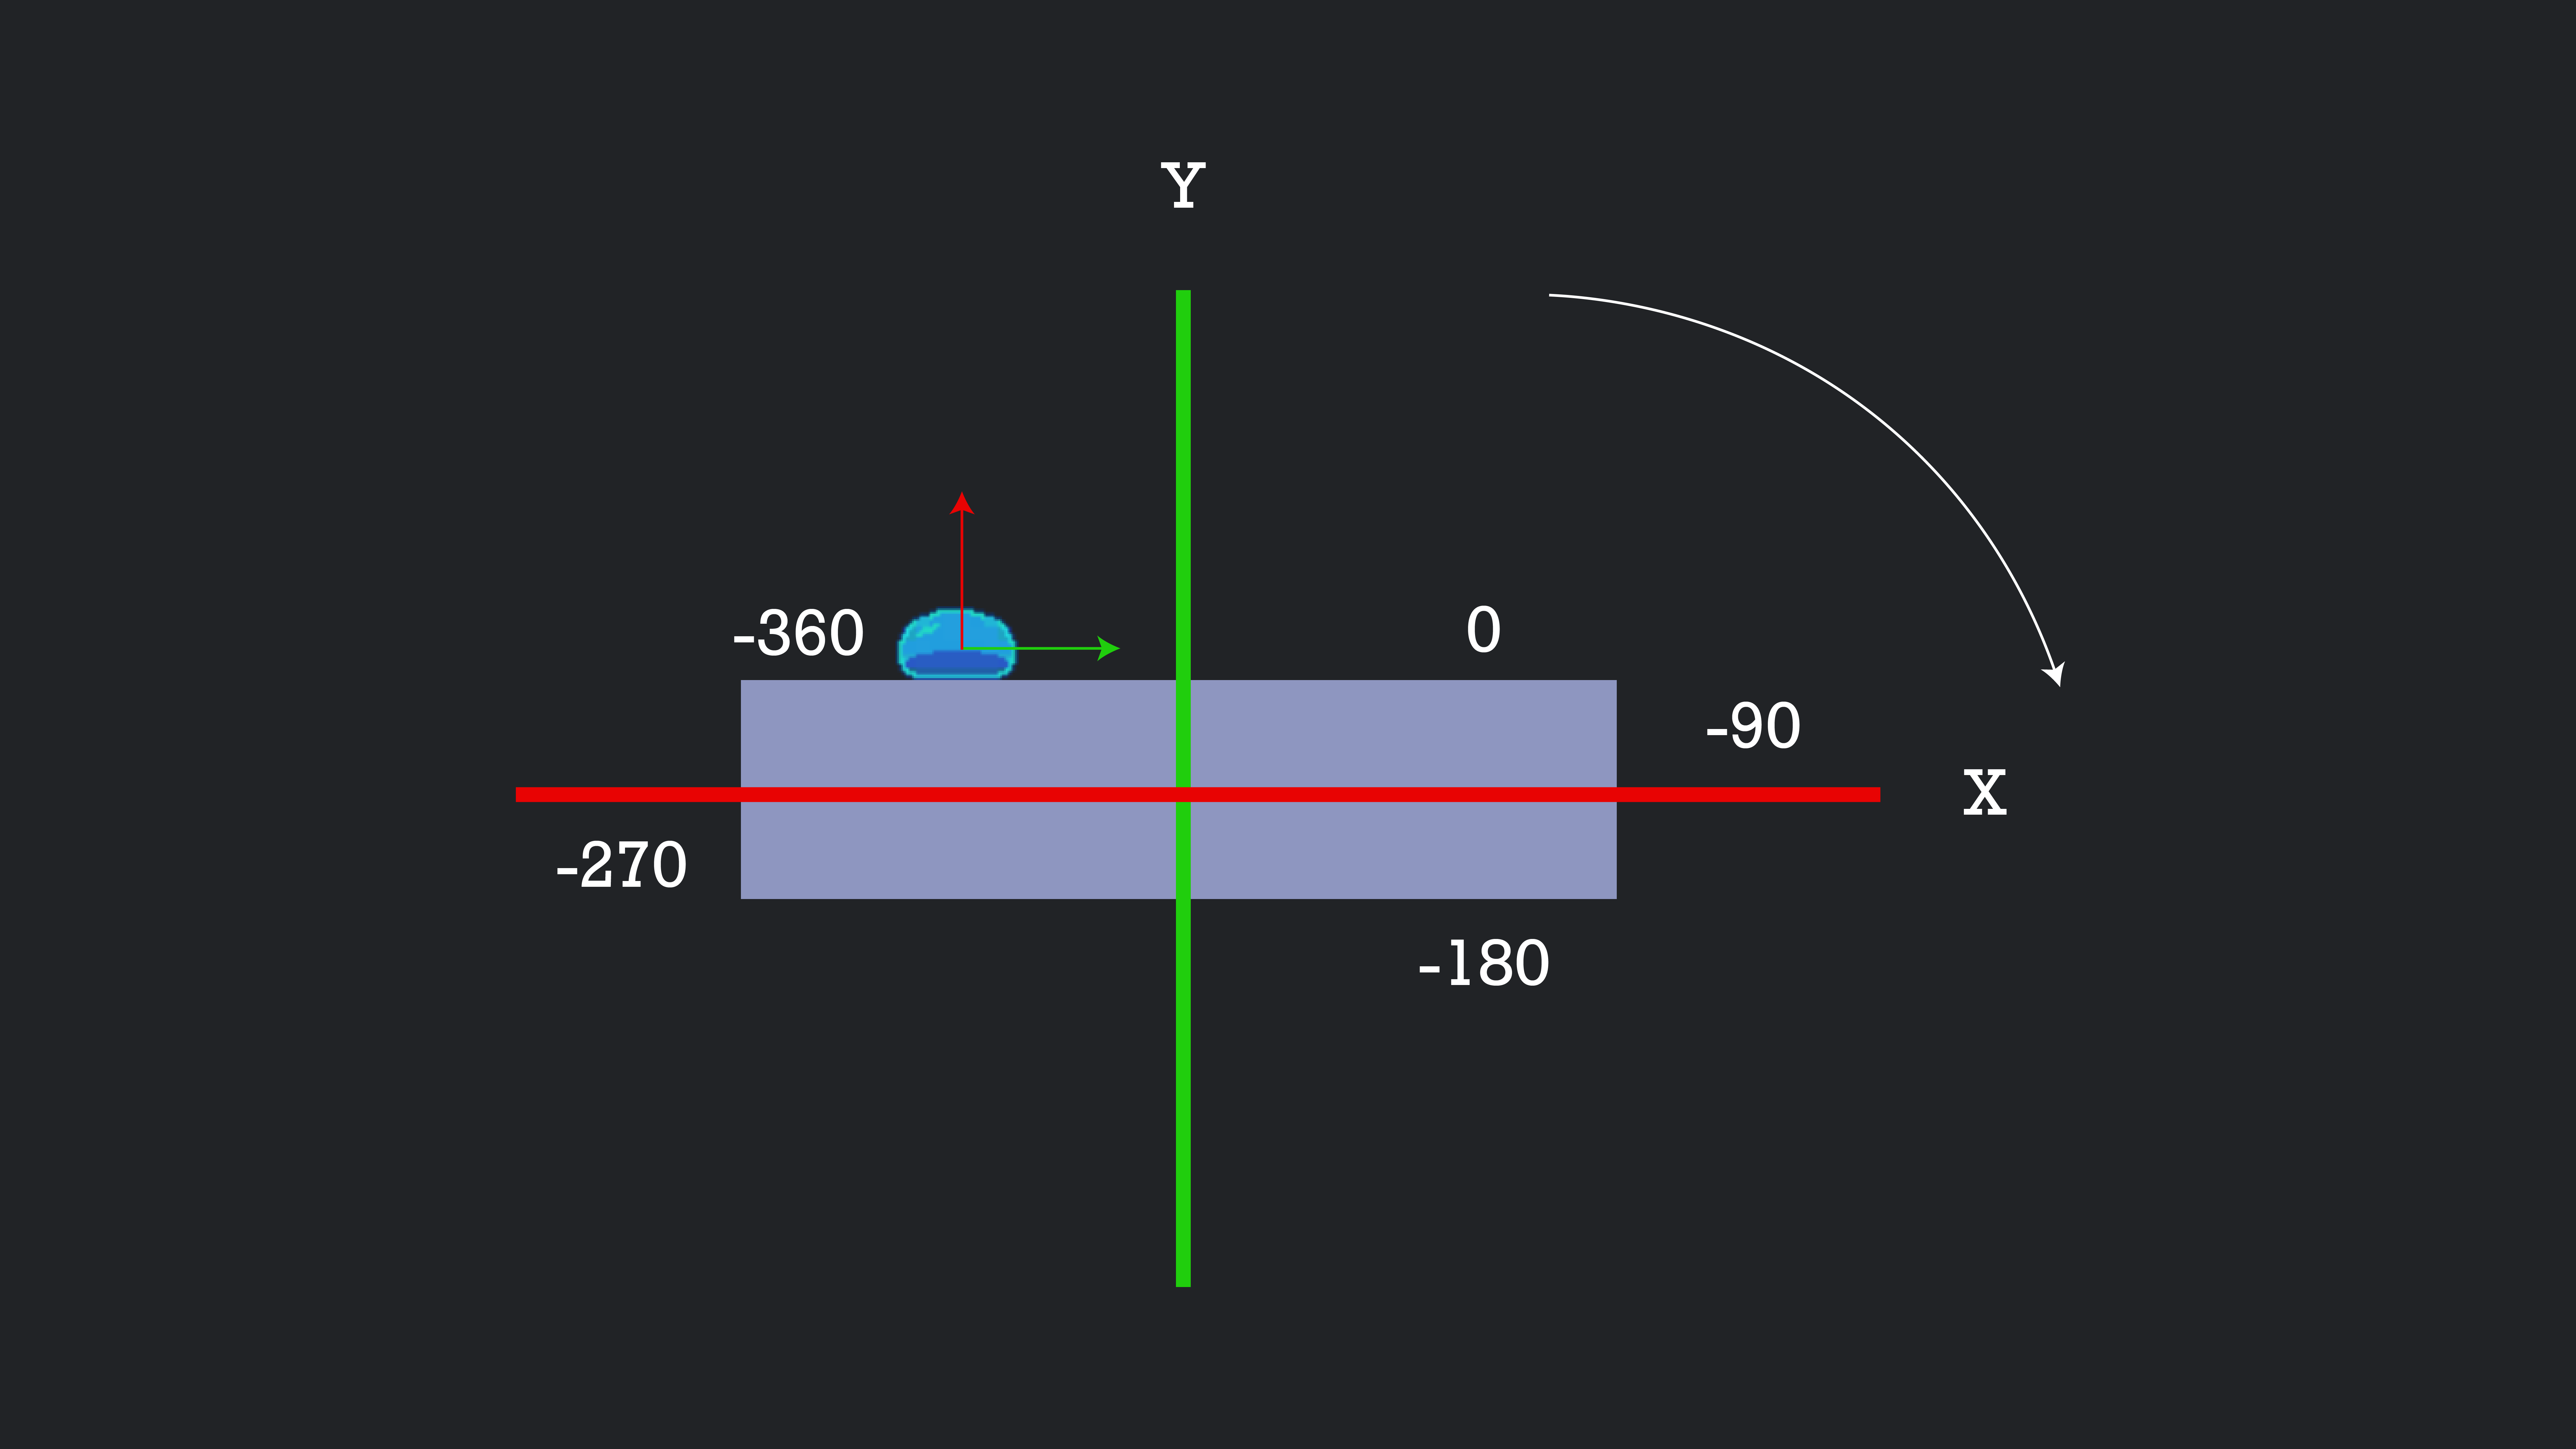
This is what we are going to be building, to be able to do that we should start by understanding what exactly we want to do, first we know that we need to move the game object in a certain direction, in this case, we don’t need to deal with any diagonal movement only [top, right, bottom, and left] we can simply use Move Position method to move the game object. Then the moment this game object reaches the edge (end of the platform) we have to find the right angle to rotate it around the z-axis, note that the initial rotation of this game object is zero, and let’s say its initial direction is right, thus whenever it reaches the edge at the right of the platform we should rotate it by -90 degrees, then at the next edge we should rotate by -180 degrees and so on, so that tells us that at the start of each edge we have to take 90 degrees from its rotation as illustrated down below.
Now after we knew what we want to do, let’s define the variables that we are going to need.
// reference to the rigid body 2D component
private Rigidbody2D enemyRB;
// 2D vector to determine the direction the game object travels in
private Vector2 dir;
private Vector2 modifiedPos;
// represent the angle the game object needs to be rotated by
private float angle;
private bool setAngleOfRotation;
// to determine if the game object touching the ground or not
private bool isGrounded;
private Transform rayStartPoint;
private float rayLength;
private float rayXOffset;
private LayerMask groundMask;
// linear speed of the AI
private float crawlingSpeed;
// to maintain the position of the game object from the platform, so it always sticks to it
[SerializeField] private float positionOffset;
In the Start() method we need to initialize some variables as follows:
private void Start()
{
    enemyRB = GetComponent<Rigidbody2D>();
    dir = Vector2.right;
    modifiedPos = Vector2.right * positionOffset;
    angle = 0.0f;
}
The whole magic happens inside the Fixed Update() method, at the beginning we should move the game object to the right since it’s the initial state, then we will figure out the next direction.
We know beforehand that we will be moving in a circular way clockwise as the previous image illustrates, in other meaning, we need to move to the right → bottom → left → top, then back to right, which leaves us only with the rotation problem, it’s actually rather simple all we need to do is to shoot a ray downward from the center of the game object or from the bottom it doesn’t matter as long as it hits the platform to determine if the game object touching the ground or not, then we make a simple if statement to check when not touching the ground there where we want to rotate the game object.
void FixedUpdate(){
    enemyRB.MovePosition(enemyRB.position + dir * (1 - Mathf.Exp(-crawlingSpeed / 2.0f * Time.fixedDeltaTime)));
    isGrounded = Physics2D.Raycast(rayStartPoint.position + transform.right * rayXOffset, -rayStartPoint.up, rayLength, groundMask);
    Debug.DrawRay(rayStartPoint.position + transform.right * rayXOffset, -rayStartPoint.up * rayLength, Color.green);
    enemyRB.MoveRotation(angle);
    if (!isGrounded && !setAngleOfRotation){
        if (angle == -360.0f)
            angle = -90.0f;
        else
            angle -= 90.0f;
        DirectionAndPositionOffset(angle);
        enemyRB.MovePosition(enemyRB.position + modifiedPos);
        setAngleOfRotation = true;
}
    if ((angle <= 0.0f) && isGrounded){
    setAngleOfRotation = false;
}
}
The DirectionAndPositionOffset(float angle) method is an intermediary method that simplifies some of the work, right after we rotate the game object we pass the angle to this method and it changes the direction accordingly as well as updating its position based on the offset variable that we declared above.
private void DirectionAndPositionOffset(float angle){
    switch (angle){
    case -90.0f:
    dir = Vector2.down;
    modifiedPos = Vector2.right * positionOffset;
    break;
    case -180.0f:
    dir = Vector2.left;
    modifiedPos = Vector2.up * -positionOffset;
    break;
    case -270.0f:
    dir = Vector2.up;
    modifiedPos = Vector2.right * -positionOffset;
    break;
    case -360.0f:
    dir = Vector2.right;
    modifiedPos = Vector2.up * positionOffset;
    break;
}
}
Dynamic
Rigid body dynamics are concerned with studying the motion of one body or interconnected bodies under the action of external forces. Dynamics are described by the law of kinematics, the applications of newton’s second law (F = m * a), even though they are related to newton’s second law the most but we still can’t ignore the other two laws because they are all interconnected with each other and important to understand all three of them properly for they appear in each observation and experiment.0
There are three types of motions that a rigid body falls into:
- Translational motion [Rectilinear motion, Curvilinear motion], where all particles have the same velocity and acceleration.
- Rotational motion [Rotation around a fixed axis], where the rotational motion of the body is determined by the angular velocity of the rotation.
3. General plane motion [neither pure rotation nor a translation].
Lucky we are, in Unity or any other game engine the physics engine does all this work for us, so we don’t have to worry about any of these complicated topics. Unless you trying to make your own physics engine.
In Unity, a Dynamic rigid body is the default one, as it is considered the most common type to be used when dealing with movement and rotation, it does have a mass and both linear and angular rotation, obviously, it’s affected by gravity and any external forces, it can collide with all other rigid body types, and moved by incoming collisions makes it the most expensive type — performance-wise.
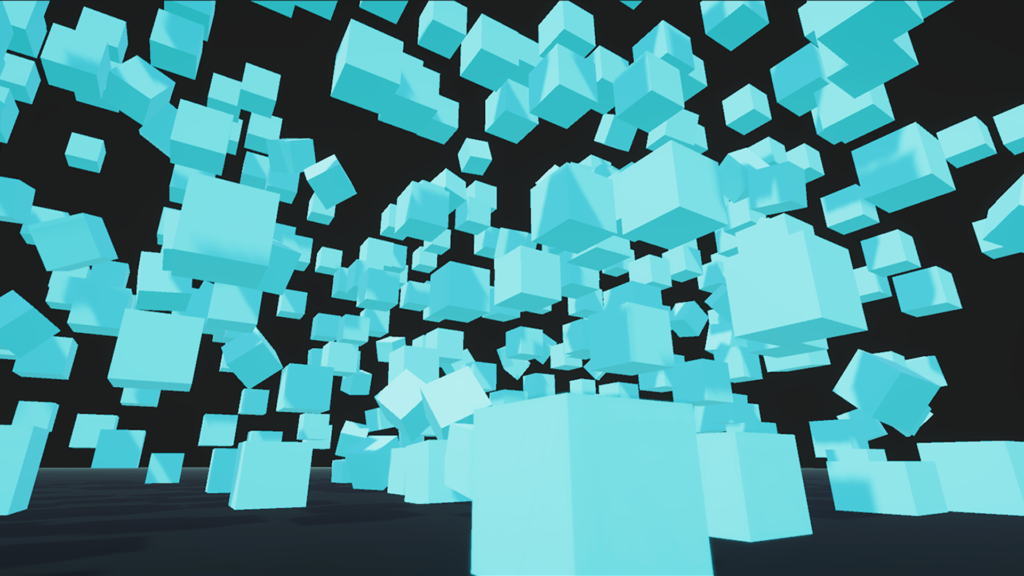
Have a look at the following gif showing hundreds of dynamics rigid bodies falling under the action of gravity

In this image, these game objects are only affected by gravity so as soon as I hit the play button they will fall onto the ground. Have a look at the second image where we add both linear and angular drag along with gravity, you can tell that they struggling to fall onto the ground.

The examples of using dynamic and kinematic physics in games development are everywhere, from character controllers to all different gameplay mechanics, which makes this a very important topic for all games Developers
Resources
The source code and all the related project files on GitHub → CrawlingEnemyAI
Thanks!